
Image color is an important aspect of visual communication, as it can convey different meanings, emotions, and messages to the viewers. Changing image color can be helpful for various purposes, such as enhancing the creativity of your photos, correcting the color imbalances caused by lighting or camera settings, or adapting your images to specific visual styles or themes. In this article, we will explore some of the reasons why you might want to change image color and how you can do it using two different tools: Photoshop and ZMO.Ai. We will also provide tips for achieving the desired results and preserving the image quality. By the end of this article, you will be able to change the image color with ease and confidence.
Reasons for Changing Image Color
You should change the image color for many reasons, depending on your goals and preferences. Here are some of the common ones:
Creative enhancements:
Changing image color can help you create more artistic and expressive photos by adding contrast, mood, or drama to your images. You can also use color to emphasize certain elements, create a focal point, or tell a story with your photos.
Correcting color imbalances:
Sometimes, the original color of your images might need to be more accurate or pleasing due to factors such as lighting, camera settings, or environmental conditions. Changing image color can help you fix these issues by adjusting your images’ white balance, exposure, saturation, or hue. This can make your photos look more natural, realistic, and balanced.
Adapting to specific visual styles or themes:
Changing image color can also help you match your images to distinct visual styles or themes, such as vintage, retro, sepia, black and white, etc. This can give your photos a unique and consistent look and make them more suitable for specific purposes, such as social media, websites, or presentations
Method to Change Image Color
Many tools are available for changing image color, but we will focus on two of them: Photoshop and ZMO.AI. Both are powerful and easy to use but have different features and advantages. Here is how you can use them to change image color:
Photoshop
Photoshop is a popular and professional image editing software that offers much control and flexibility for changing image color. You can use various tools and techniques to change image color in Photoshop, but one of the simplest and most effective ways is to create a layer mask and sample your target color. Here are the steps to follow:
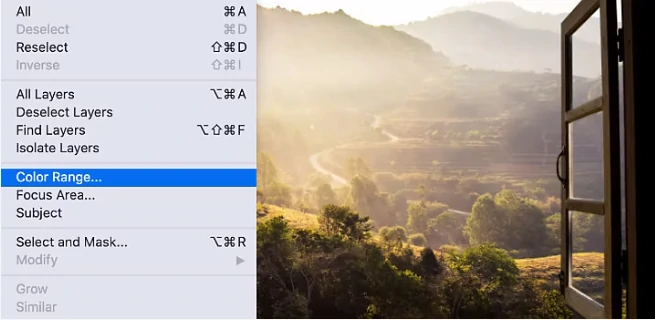
Step 1: Create a layer mask:
Open your photo in Photoshop, then duplicate the background layer by pressing Ctrl+J (Windows) or Command+J (Mac). Click on the Add Layer Mask icon at the bottom. This will create a white layer mask that covers the entire image. Click the Select menu and select Color Range from the options provided.
Step 2: Sample your target color:
Choose the Eyedropper from the Toolbar and click on the color you want to change in your image. This will specify the foreground color to the sampled color. You can also use the Color Picker to choose any color you want.
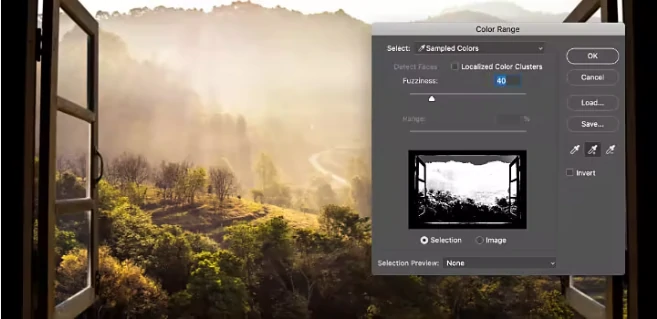
Step 3: Refine your selection:
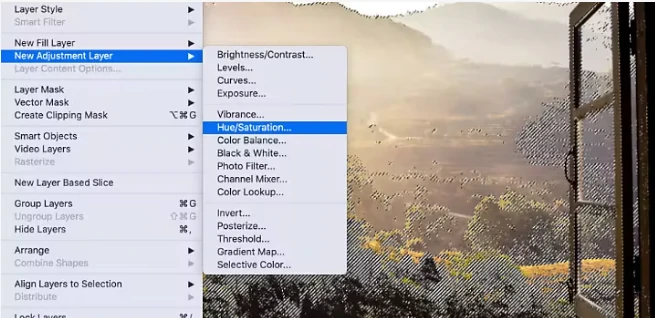
Fine-tune your selection by adjusting the Fuzziness slider as required. Once you’ve achieved the desired color selection accuracy, click OK to exit the menu. Proceed to the Layer menu, choose New Adjustment Layer, and then select the Hue/Saturation option.
Step 4: Save your layer:
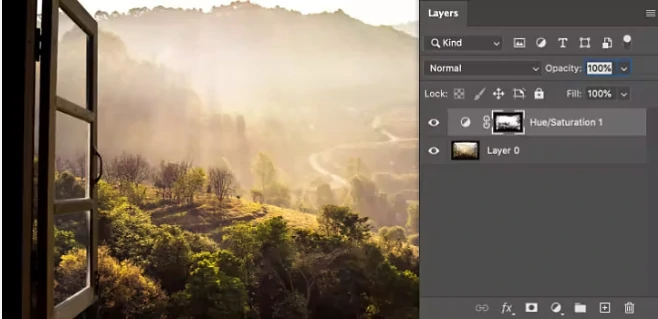
Confirm the “Use Previous Layer to Create Clipping Mask” option is unchecked, then click OK. This action will preserve a Hue/Saturation adjustment layer and the newly generated mask.
Step 5: Change your colors:
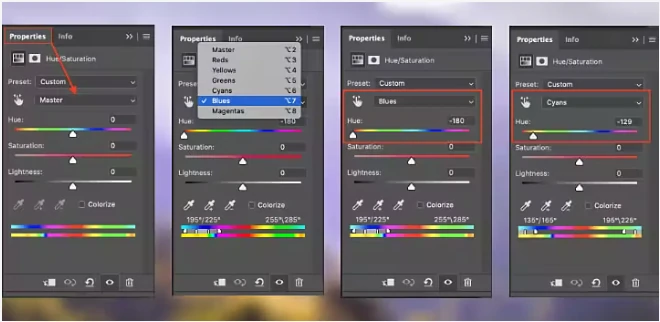
Next, pick the Hue/Saturation layer with your mask. In the Properties menu, select the color category you wish to modify from the second drop-down menu, like Blues, Reds, or Cyans. Use the Hue and Saturation sliders to attain your preferred appearance. Since photographs often encompass diverse colors, you might need to modify multiple color sets. For instance, adjusting Blues may also necessitate tweaking Cyans to account for the lighter portions of the sky.
After achieving the desired color aesthetics through Hue and Saturation adjustments, save the image in your preferred file format for sharing. Alternatively, refine the image by enhancing or retouching it before showcasing it.
Quick Method to change image color: ZMO.Ai
ZMO.Ai is an online photo editor that uses artificial intelligence to change image color. It is very easy and fast to use and can produce realistic and natural-looking results. You can use ZMO.Ai to change the image color in just a few clicks. Here are the steps to follow:
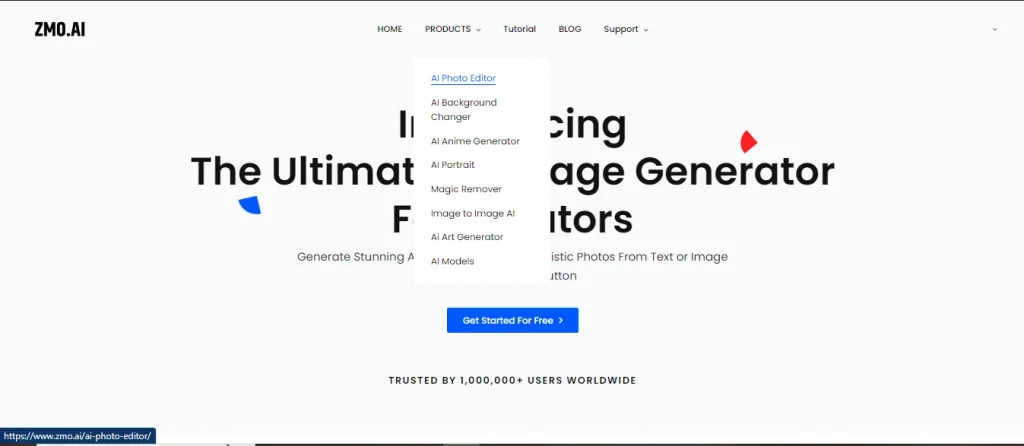
Step 1: Go to the ZMO.Ai website and select Photo Editor from the menu
You can access ZMO.Ai from any browser and device. Once on the website, click the Photo Editor option from the menu bar. This will take you to the photo editor page, where you can upload your image or choose from the sample images.
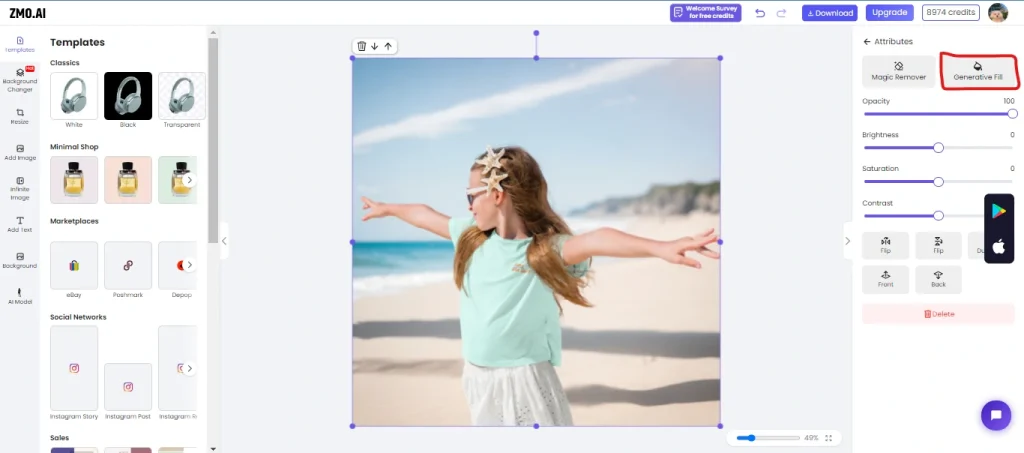
Step 2: Upload Photo
To upload your image, click the Upload Photo button and pick the image from your device. You can also drag and drop the image to the upload area. The image will be uploaded and displayed on the editor.

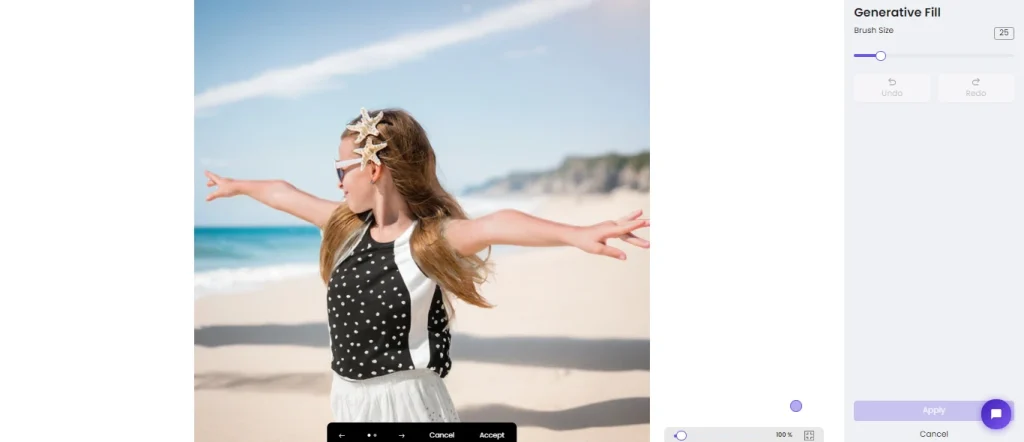
Step 3: Select Generative Fill from the right side
On the right side of the editor, you will see a list of tools and options. Click on the Generative Fill tool, the second option from the top.
Step 4: Fill the area with mouse to change the color
To change the color of an area in your image, you need to fill it with the mouse. You can change the size and hardness of the brush from the prompt box. Then, you can click and drag the mouse over the area where you want to change the color. The area will be filled with a transparent color, indicating it is selected. For this, I want to change the color of the shirt.
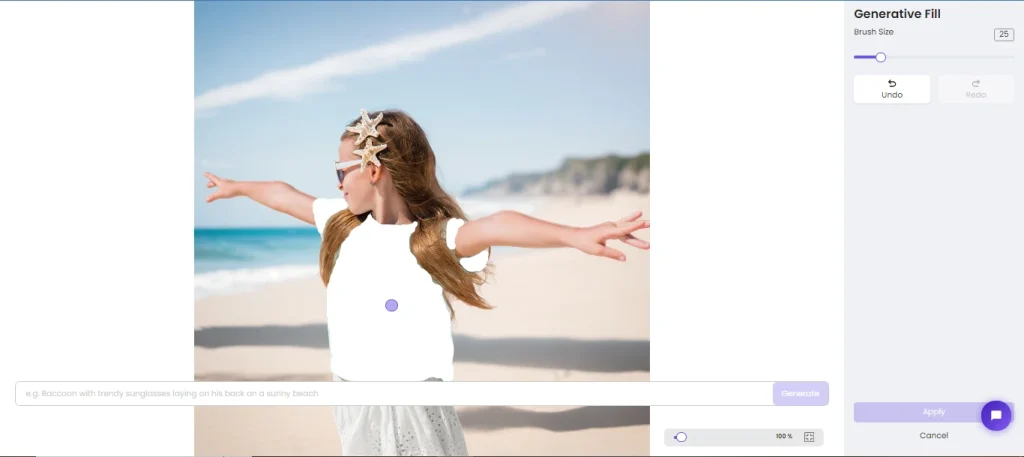
Step 5: Give the command or prompt that you want to change
After filling the area, you need to give the command or prompt that you want to change the color. You can type the command or start in the text box below the prompt box. For example, you can type “change color to red,” “blue,” “green,” etc., to change the color to a specific color. You can also type more complex commands or prompts.
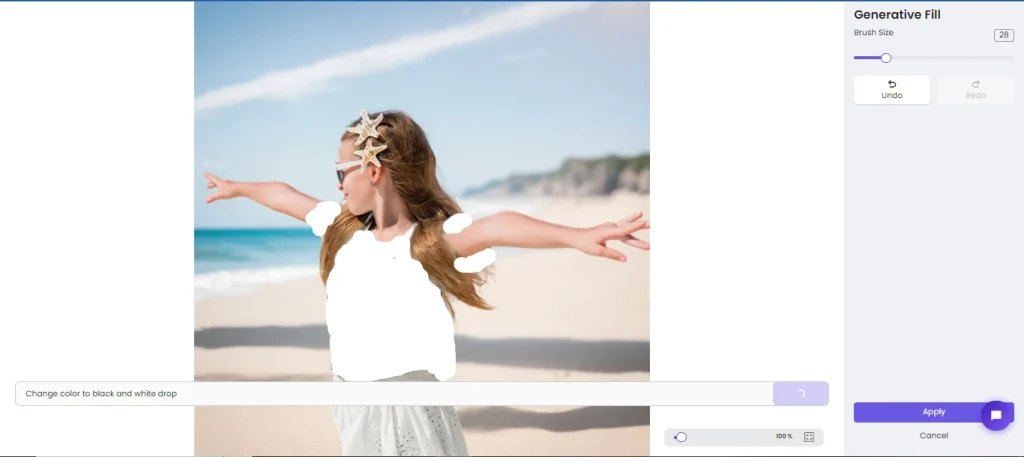
Step 6: Accept and apply
Once you have given the command or prompt, you need to accept and apply it. You can do this by clicking the Accept button in the prompt box. This will generate the new color for the selected area and apply it to your image..
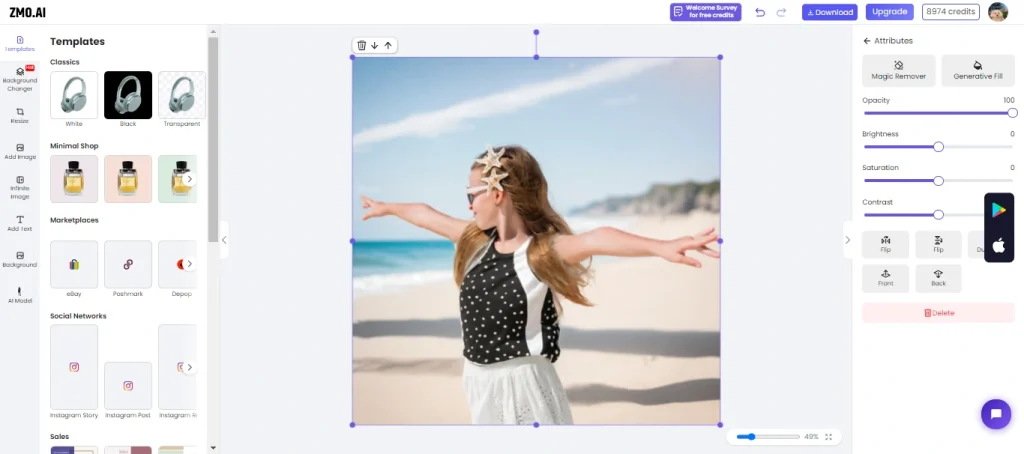
Step 7: Edit the photo with different filters
After you have changed the color, you can edit the photo with different filters to enhance your image’s overall look and feel. You can choose from filters, such as Brightness, Contrast, Saturation, Sharpness, Blur, etc., from the right side of the editor. You can also utilize the Crop, Rotate, Flip, and Resize tools to adjust the size and orientation of your image. You can preview the changes on the editor and undo or redo any actions by clicking on the Undo or Redo buttons.
Tips for Achieving Desired Results
Changing image color can be a fun and rewarding venture, but it can also be complicated and frustrating if you don’t get the desired results. Here are some tips for achieving the desired results and preserving the image quality:
Preserving image quality:
When changing image color, you want to ensure your image quality is not compromised or degraded. To do this, you should always work with high-resolution images and save them in a lossless format, such as PNG or TIFF. You should also avoid over-editing or over-saturating your pictures, as this can make them look unnatural or distorted. You can use the Zoom option to check the details and sharpness of your images.
Experimenting with different color schemes:
Changing image color can open up many possibilities and opportunities for creativity and expression. You can experiment with different color schemes, such as complementary, analogous, triadic, tetradic, etc., to create other effects and moods for your images.
Utilizing layers for non-destructive editing:
One of the best practices for changing image color is to utilize layers for non-destructive editing. This means that you can edit your images without affecting the original image and undo or modify your changes at any time. You can use different layers, such as adjustment layers, fill layers, or smart objects, to change image color differently. You can also utilize layer masks, blending modes, and opacity to control the visibility and effect of your layers. You can also group, rename, and organize your layers for better workflow and management.
Why is ZMO.AI the best?
Ease of use:
ZMO.AI is very easy and fast to use, as it does not require installation, registration, or complex settings. You can access ZMO.AI from any browser and device and upload your photo in seconds.
Versatility:
ZMO.AI offers a range of features and options to change image color and enhance your photos. You can use the Generative Fill tool to fill any area with the color of your choice or use more creative commands or prompts, such as “Make it look like a sunset,” “Make it more vibrant,” or “Make it match the sky.” You can also use the Background Remover and Background Changer tools to eliminate or replace the background of your image with another one. You can edit your photo with filters such as Brightness, Contrast, Saturation, Sharpness, Blur, etc.
Realism:
ZMO.AI uses advanced AI technology to produce realistic and natural-looking results. The AI understands the context and content of your image and generates the color that best suits it. The AI also preserves your image’s details and texture and blends the color seamlessly with the original image.
FAQs
How does ZMO.Ai use AI to achieve realistic color changes?
ZMO.Ai utilizes advanced AI technology to understand the context and content of your image, ensuring that the generated color changes seamlessly blend with the original image, providing a realistic and natural-looking result.
Can ZMO.Ai handle more complex color change requests beyond basic commands?
Yes, ZMO.Ai is versatile and allows for more creative commands or prompts, such as “make it look like sunset,” allowing users to achieve unique and artistic color changes.
Does ZMO.Ai offer options for background removal or replacement?
Yes, in addition to changing image color, ZMO.Ai provides tools like Background Remover and Background Changer, allowing users to eliminate or replace the background of their images.
Can ZMO.Ai be considered for quick and simple color changes compared to traditional software like Photoshop?
Yes, ZMO.Ai is specifically designed for quick and simple color changes, making it an attractive option for efficient and hassle-free photo editing without the learning curve associated with complex software.
Conclusion
Understanding the significance of image color in visual communication is crucial for conveying emotions and messages effectively. Changing image color serves various purposes, such as enhancing creativity, correcting imbalances, and adapting to specific styles. This article explored the methods of color modification using Photoshop and ZMO.AI, emphasizing their distinct features. While Photoshop offers control and flexibility, ZMO.AI stands out for its ease of use, versatility, and realistic results powered by advanced AI. The provided steps for both tools enable users to achieve desired color changes. ZMO.AI’s simplicity, creative commands, and efficient color alterations make it a favorable choice for quick and hassle-free editing.